
v2ray搭建配合宝塔面板NGINX配合cdn加速教程
cloudflare账号:没有注册一个,https://www.cloudflare.com/
中文面板 www.anancdn.com
宝塔面板:一键脚本如下:
curl -sSO http://download.bt.cn/install/install_panel.sh && bash install_panel.sh
5)vps安装好 bbr加速
#bbr 4 in 1 脚本
wget -N --no-check-certificate "https://raw.githubusercontent.com/chiakge/Linux-NetSpeed/master/tcp.sh" && chmod +x tcp.sh && ./tcp.sh
分别选择 2 和 7,根据提示即可开启成功。
2、配置宝塔
宝塔安装好之后,我们还需要做一些配置:
- 浏览器访问外网面板地址,输入账号密码登录
- 安装 LNMP 环境+Nignx 配置(可以后期搭建网站做转发)
- 只安装 nginx(不做网站转发,只做 ws)当然,你也可以好PHP~
- 添加站点。这个站点就是你 v2ray 软件里的代理地址。
3、宝塔部署
1)新建站点,并配置好ssl
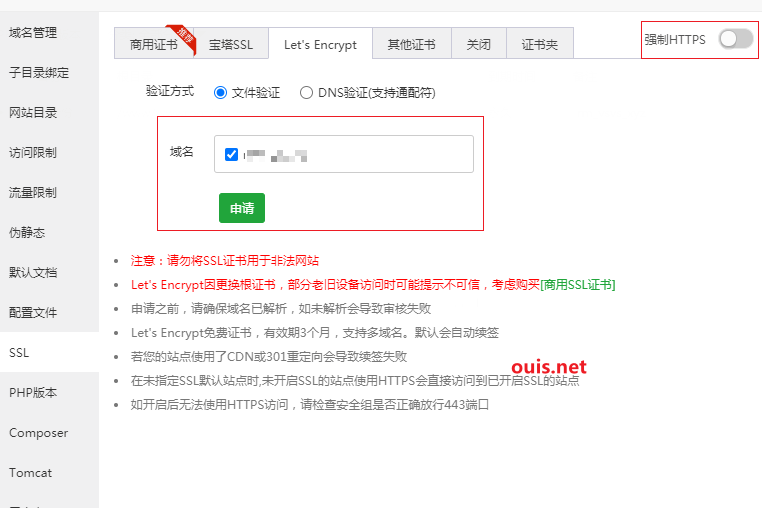
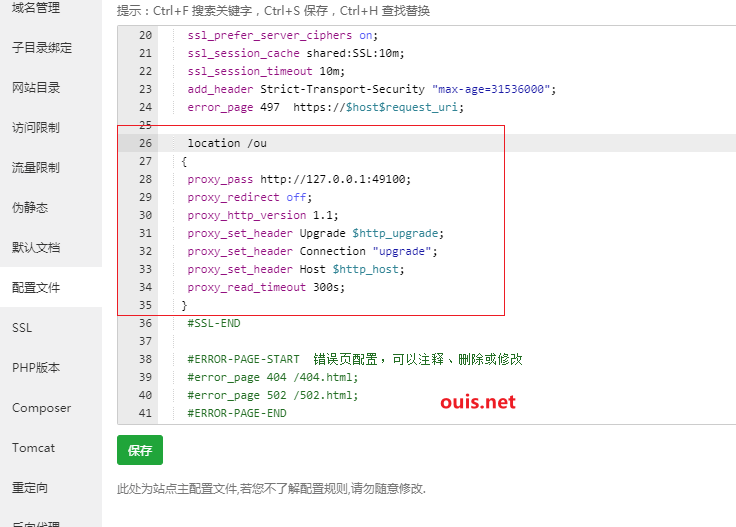
2)接下来进入 修改网站配置文件 点击配置文件,找到 #SSL-END,大概在 22 行左右,在其下面添加如下代码:
location /ou
{
    proxy_pass http://127.0.0.1:你的端口号;
    proxy_redirect off;
    proxy_http_version 1.1;
    proxy_set_header Upgrade $http_upgrade;
    proxy_set_header Connection "upgrade";
    proxy_set_header Host $http_host;
    proxy_read_timeout 300s;
}
1、其中第一行的 ou是你自己 ws 的 path,斜杠不要删除,可以自己修改,也可以不改;
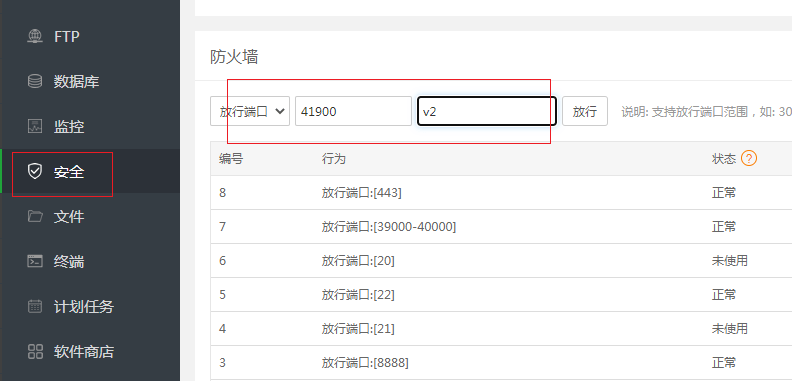
2、端口号我们这里先随便写一个比如:41900,因为现在 v2ray 官方不为你生成端口,如下图:
3)放行端口,宝塔安全处放行49100端口
接下来就是本文重点了,我们开始安装 v2ray 最新官方脚本
注意:全文采用操作系统为 centos 7
4、安装依赖软件
1)安装 cURL:
yum makecache
yum install curl
2)下载脚本
curl -O https://raw.githubusercontent.com/v2fly/fhs-install-v2ray/master/install-release.sh
curl -O https://raw.githubusercontent.com/v2fly/fhs-install-v2ray/master/install-dat-release.sh
5、使用
1)安裝和更新 V2Ray
bash install-release.sh
2)安裝最新發行的 geoip.dat 和 geosite.dat
bash install-dat-release.sh
3)点击链接生成 uuid:https://1024tools.com/uuid,复制其中一行 uuid
4)进入 /usr/local/etc/v2ray/ 目录,编辑 config.json 文件 将里面全部代码改为:
{
  "inbounds": [{
    "port": 52103,
    "listen": "127.0.0.1",
    "protocol": "vmess",
    "settings": {
      "clients": [
        {
          "id": "你的uuid",
          "level": 1,
          "alterId": 0
        }
      ],
      "disableInsecureEncryption": false
    },
    "streamSettings": {
        "network": "ws",
        "wsSettings": {
            "path": "/ou",
            "headers": {
                "Host": "你的域名"
            }
        }
    }
  }],
  "outbounds": [{
    "protocol": "freedom",
    "settings": {}
  },{
    "protocol": "blackhole",
    "settings": {},
    "tag": "blocked"
  }],
  "routing": {
    "rules": [
      {
        "type": "field",
        "ip": ["geoip:private"],
        "outboundTag": "blocked"
      }
    ]
  }
}
5)修改以上配置文件并保存,注意下 "path":"/ou" 这一行,如果你没有修改过配置文件中的 pach 这里就是 ou。
6)设置开机启动
systemctl enable v2ray
systemctl start v2ray
大功告成!之后设置客户端就可以愉快的玩耍了~如果要查询状态等,可以用下面的命令。
systemctl restart v2ray
systemctl status v2ray
6、设置客户端
1)最新版v2ray Windows客户端下载链接:
V2RayN: 官网下载
最新版本的V2rayN 4.12,不太好用,可以下载这个:v2rayN3.29
2)设置,看图: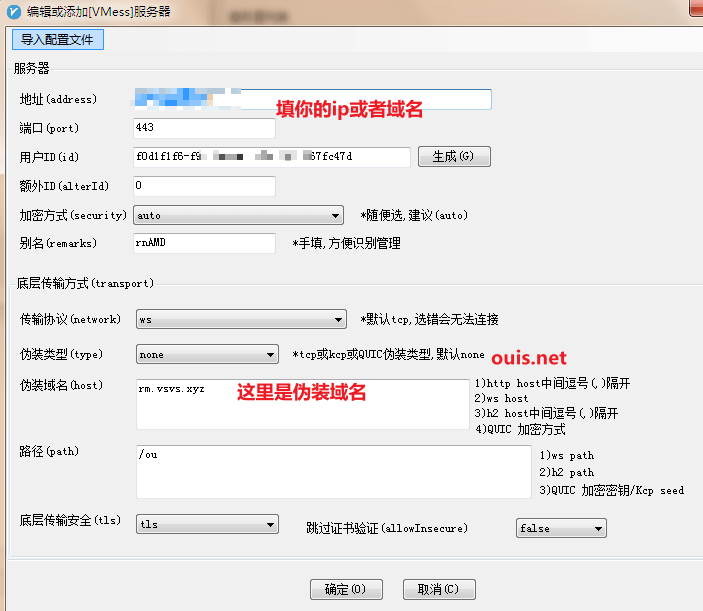
3)打开油管,或者其他就可以玩耍啦~~
7、接入cdn
1)这里用的是cloudflare,前面我们的域名是放在cloudflare托管,那么这个时候点亮橘色的云朵,即可接入cdn了。

8、移除 V2Ray
如果你不是准备卸载 V2ray ,这条命令你可以忽略,不要执行!
bash install-release.sh --remove
## 启动systemctl start v2ray
## 停止systemctl stop v2ray
## 重启systemctl restart v2ray
## 开机自启systemctl enable v2ray
usage: install-release.sh [--remove | --version number | -c | -f | -h | -l | -p]
  [-p address] [--version number | -c | -f]
  --remove        Remove V2Ray
  --version       Install the specified version of V2Ray, e.g., --version v4.18.0
  -c, --check     Check if V2Ray can be updated
  -f, --force     Force installation of the latest version of V2Ray
  -h, --help      Show help
  -l, --local     Install V2Ray from a local file
  -p, --proxy     Download through a proxy server, e.g., -p http://127.0.0.1:8118 or -p socks5://127.0.0.1:1080